Webinar Tip 4: Buying Studio Flash Lighting
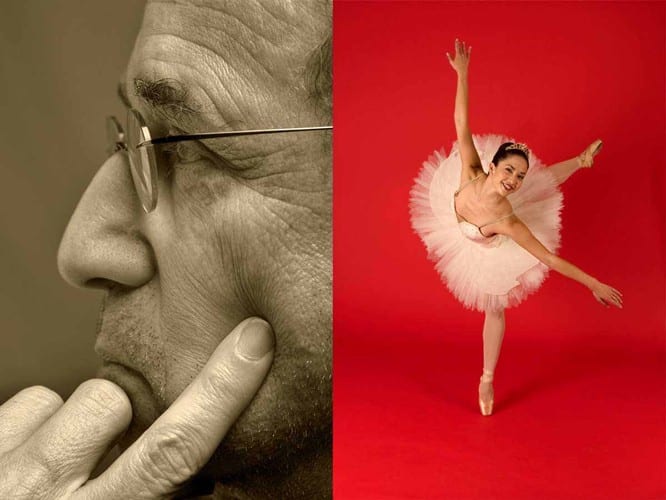

Photos by ©Frank Siteman, DPA instructor, Boston
The studio lighting portraits above shot by DPA instructor Frank Siteman, are two very different techniques and styles shot for different projects. Notice the even lighting on the dancer lit from more than one direction (see the multiple shadows cast by the dancers foot). The close up black and white portrait by comparison illustrates more contrast and more directional lighting. Each photo is significant and poignant for it’s purposes and distinct style.
Studio Lighting and Equipment: I recently got an email inquiry from one of my DPA students, an avid photo enthusiast who had attended a number of my previous advanced workshops. Chris was looking to expand his gear and purchase a studio flash lighting system. This can be a big step, and is especially daunting if you don’t really know what you need, or what you’re looking for. DPA instructors across the country are all working professional photographers, as was the initial concept behind DPA when it was launched in 2007. Find working pro photographers who are interested in sharing their knowledge … Pros with experience in the real world of photography. Thus if you want to get some real world insight or advice on lights or other equipment you should turn to the pros, people who actually use the gear on a regular basis. Any of the DPA photographer/instructors will happily provide advice during the workshops on how to expand your camera system. My student Chris had noticed a lighting system on eBay that sounded too good to be true. It in fact was not a complete wash it just comes with a caveat. With photography equipment you often (if not always) get what you pay for. That said if you are gentle with it and don’t’ shoot in adverse conditions, and don’t use it consistently as most pros do a cut-rate lighting system might actually last you a long time. Pros spend significant money on lights that will recycle fast, shoot day in and day out and take a beating on location, we have to. As a semi-pro or enthusiast with a basement photo studio that gets used 3 days a month you have a bit more leeway with the quality of your equipment.

Photos by ©Carlos Javier Ortiz, DPA instructor, Chicago
Two different frames from a shoot by photographer Carlos Javier Ortiz show the subtle difference direct eye contact can make in a portrait. Both shots are credible and striking but each projects a different mood and style.
Chris first had me look at a system that was a continuous light (no Flash) kit. The seller had camouflaged that fact to the point Chris could not tell it would not shoot flash. Devious. Again, another reason to have the advice of a pro, they can look for things you wouldn’t know to see.
The first decision is continuous light (Tungsten, Hot Lights) VS flash? With low budget lights you can be assured you’re getting a knock-off Chinese brand, not great quality. When considering Hot Lights a good system for $250-400 for two or three lamps plus stands, umbrellas, case etc is standard. But considering all you get it’s a complete system. Downside is the Hot Light lamps are HOT and don′t put out much light. You will probably get a maximum aperture of f8 at 200 ISO. Many lamps have dimmers, which is good, it’s difficult to control hot lights without them. The more powerful lights of 1000 watts per lamp could also be an issue for household AC; you′ll need to run off different circuits to avoid tripping breakers. I′d say these are good at a low price for still life photos (for listing sale items on eBay etc) but if you want to photograph people you should look at a flash system. Studio flash systems have more power, they generate flash AND continuous light (modeling light), and are generally better quality. Unless you buy in a kit you′d still have to buy the soft boxes, case etc.
Next I found a bargain priced Flash System for Chris but thus began a debate over the merits, pros and cons of such a low priced kit. The ultimate question being would the system hold up to use over time.
Chris asked: Flash kit $339. This is too good to be true!! lol…..I′m wondering if this system would still work after one photoshoot. 3 FLASH STROBE LIGHTS HOME STUDIO KIT 18 Month Warranty, 600W/S Radio Wireless Trigger.
If this system would still work after one photoshoot … Well that is the question. It says the item is located in California, but also says international shipping takes 2-4 weeks. Either way it’s a Chinese knock off. I’m sure the quality is not great but anything of good quality is going to cost you 3+ times as much. There is a reason good flash units cost $3000+. If you don’t use it too much it might last a while. It says 18-month warranty but I suspect you would have to ship it back to China to make a claim, which would cost $50+. It is a risk but at a relatively low cost it’s an acceptable one. I would definitely use this with a Power strip (circuit breaker) in case of spikes. The alternative would be to buy a used good quality system but that will still cost $1000.
If a system comes with a number of different light modifiers, such as one umbrella, one soft box etc you would do well to spend a little extra to get two modifiers that match (two identical umbrellas). This can be very useful when trying to light specific subjects or spaces. If you buy a lighting kit with only 2 lights you can easily purchase a hot shoe bracket, to mount a portable Speedlight, an auxiliary on-camera flash, on a stand, using it as 3rd light in the background. You can light almost anything with 3 lights.

Photo by ©John Bentham, DPA instructor, New York.
This production shot from one of John’s advanced lighting workshops shows a lighting set-up with an Octobank and lighting panels to cut flare from the background.
Having talked about working on a budget there is however a rational for buying good lighting support, stands, umbrellas etc. This stuff takes a beating … And working with bad stands is very frustrating. This equipment, traditional called GRIP is typically the least expensive part of a lighting kit. The lights being the most costly. Thus if you save a little money on lights you can spend a bit more on good Grip gear. Manfrotto tripods, Avenger stands, Century stands, and Lastolite reflectors … All these are good products that you will benefit from using. If your stands cant support the weight of your lights or background, and stuff starts hitting the floor, or worse the models head, you don’t want to learn the hard way you should have $50 on a stand instead of $16.
Some things you should not skimp on. Tripods I have found are one item to invest more money in initially. Over the years I have spent approximately $2500 collectively on tripods. I bought a cheap one that didn’t really work well, then a bigger and better model that worked OK for a while. But I still had to invest more later to get a stronger sturdier model, then spend additional money on a lighter smaller tripod for traveling. After trial and error and experimentation I finally ended up with the system I have now … A very heavy, sturdy, tall (9 foot), metal Gitzo tripod for advertising shoots and studio work coupled with a smaller, much lighter Carbon Fiber Manfrotto tripod that I use on location. The retail cost of these two would be approx $1200. If I had bought them initially I’d be ahead by $1300. Sometimes it doesn’t pay to try and save money, especially when you’re talking about professional photo gear, tripods, lenses, cameras etc.

Photo by ©John Bentham, DPA instructor, New York.
A more directional and stark lighting design is displayed here using a 2×2 foot soft box with the subject against a black background. This contrast intense type of lighting produces a moody and dramatic lighting effect with heavy deep shadows.
As with any tools, buy the best possible tools you can afford. I have an Estwing claw hammer that cost $30 in 1979. Back then, as now, you could buy a hammer for $5 but this is an indestructible hammer and has been used heavily for over 30 years. I doubt a $5 hammer would last more than a couple years. There are also technical reasons why pros spend $1200 on a fast f1.4 24mm lens VS spending $300 on the f2.8 version.

Photo by ©John Bentham, DPA instructor, New York.
An alternative lighting set up above shows with the main light provided by a large 36×48 inch soft box. This type of light is soft, big and even but still has a punch with nice deep shadows. The more a reflector is pulled into the dark side the softer and brighter the shadow will be. By pulling out the reflector, or as shown in this shot by putting in a black flag close to the model, which absorbs light the shadow is actually increased. Lighting takes a while to learn since there are so many ways to approach and light any subject … remember – practice, practice practice.
Webinar Submission Specs:
All DPA students can submit photographs for inclusion in the Digital Photo Academy, LiHD Webinar, and Online Photo Class Series. If you would like to submit your photographs for an upcoming webinar, read the following. Each webinar has a specific theme or topic. You can see the date and topic of the next webinar at LivinginHD.com, Tip of the Day, Online Photo Class. Note that webinars are edited and formatted days in advance, thus please submit your photos at least a week in advance of the webinar, late submissions can not be added. Photographs are chosen, and edited, for their applicability to the webinar theme, artistic and technical merit, and content length. If your photograph is NOT chosen, it will be archived and may appear in a more appropriate future webinar.
Submit your photographs to info@digitalphotoacademy.com
By submitting your photographs for consideration, you grant and authorize, The Digital Photo Academy, LivinginHD.com and Panasonic, the following rights: The right to use your photographs in the content and promotion of the webinar series, and for use on each company’s respective website. You further authorize your photographs may be archived online and/or in a database, and allow unrestricted internet availability of any webinars containing your photographs. You further authorize the use of your photographs in any future webinars. By voluntarily submitting your photographs for consideration you agree to the aforementioned without any legal claims, or claims for remuneration, whatsoever. You, as the photographer, retain the copyright © of any submitted photographs. The aforementioned companies will make best possible efforts to apply proper photo credit and acknowledgement with your photograph whenever possible and practical.

