Tripods and Cable Releases
Digital Photo Academy and LivinginHD present a free monthly series of photography webinars. Your host, John Bentham answers many questions live during the webinars. Additional questions, answers and tips are posted here on digitalphotoacademy.com where you can also view the archived webinars.
Metal, Plastic and Carbon Fiber Tripods: When choosing a type, size and particular model of tripod there is always a tradeoff between height (both minimum and maximum height), weight, load capacity and stability. A good, heavy, sturdy solid tripod is required for long exposures, the heavier the better. But then you have a tripod you have to carry. A heavy tripod which works well to keep your camera stable becomes a very heavy tripod to haul on location. I have a modified Gitzo metal tripod complete with a double center column and auxiliary extension leg sections for additional height. It’s very heavy (20 lbs), big with a maximum height of almost 9 feet (which I can extend to 12 feet using a Manfrotto Magic arm). It’s an indestructible tripod and I use it in situations where obviously I need extreme height, need a very stable platform for a heavy camera and … I have an assistant to help carry the equipment.

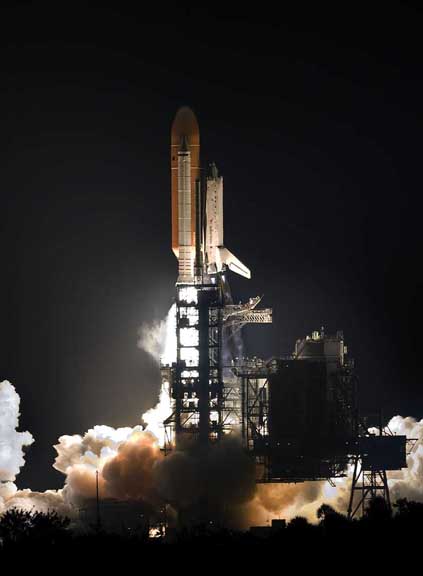
Fig 1
Photo by Milton Heiberg, DPA Instructor, Orlando
In the two space shuttle launch photos here photographer Milton Heiberg, DPA Orlando Florida, utilized a tripod not for slow shutter speeds (Fig 1 at1/1000 second, Fig 2 at 1/4000 second) but for stability when using a long lens (500 mm) and for tracking ability to follow the shuttle rocketing towards space. These photos are made much more dramatic by virtue of it being a night launch. By comparison a day time shuttle launch is almost anti-climactic, as difficult as that is to imagine. Some subjects just beg to be photographed in darkness.
There are however a number of situations where the big Gitzo is not appropriate. This is where a lightweight Carbon Fiber Manfrotto tripod comes into play. I have a Manfrotto 055CXPRO3 Tripod and 322RC2 Pistol Grip Head. This tripod extends to approx 6 feet tall and utilizing a surprising marvelous design will collapse to a few inches off the ground. It’s fairly compact and best of all the Carbon Fiber construction makes it very light relative to size and load capacity. I can easily mount a full size DSLR with long telephoto zoom without fear of collapse. When shooting at indoor locations, or in studio the tripod is great used on it’s own. When shooting at outdoor locations with the possibility of wind vibration and camera shake I simply add additional weight once I’ve reached the location. This can be as simple as hanging a camera bag from the built in tripod hook, or at times adding an optional weight bag, or water bottle for stability. Obviously you don’t want to pack in the extra weight so you carry in the tripod and bag (or water bladder) empty and add water or rocks once you reach your location. This method affords you the ease and mobility of a light carbon fiber tripod combined with the solid stability of a heavy camera support through the use of additional ballast, especially useful when shooting in the wind.
I have found through bitter experience that spending more money initially (sometimes significantly more), on a good tripod is more economical over time than buying a cheap tripod. Of course this is dependent of how often you need a tripod. If you only use a tripod once a month to support a lightweight camera you don’t need to spend a great deal of money. However if you are a professional and hauling a tripod to shoots on a weekly basis you should invest some money upfront for something flexible, stable and strong with a decent working range between min and max height.
Plastic tripods are inexpensive and lightweight but often flimsy in construction and not particularly stable especially under a load. Metal (often magnesium) tripods are less expensive but heavier than Carbon Fiber. Everything in photography equipment is a trade off, you get what you pay for. I remember watching a TV interview with a Space Shuttle maintenance mechanic who said the rubber tires on a shuttle craft were rated for 2-3 missions (consecutive landings) but were replaced prior to each mission. The reason being it didn’t make sense risking a $1.8 Billion spaceship on a $4000 tire. If you apply a similar logic to selecting a tripod you don’t want to support a $5000 camera on a $50 plastic tripod blowing in the wind.

Fig 2
Photo by Milton Heiberg, DPA Instructor, Orlando
The 2nd most common use of a tripod is in maintaining a camera specific position. I often utilize a tripod when I’m shooting portraits with a relatively light DSLR, a medium length lens (100mm) and a relatively fast shutter speed (1/160th second). In this context I’m not using a tripod to avoid camera shake or blur which isn’t an issue at these settings, especially when combined with studio flash which will freeze the motion of the subject. Using a tripod in this situation maintains continuity in focus, focal length and framing. By having the camera on a tripod the camera position remains constant which is a big plus if you are shooting multiple subjects on the same set, or if the Art Director wants to make changes on the set and then have you shoot additional frames. Identical framing is also very useful, if not required when shooting multiple images to create HDR (High Dynamic Range) images using composite software. You may not expressly need the stability of a tripod for a slow shutter speed but you need it to register (line up) the multiple frames.
Camera Cable Release: When ever using a tripod and long shutter speeds you must avoid camera shake. This occurs most commonly when tripping the shutter at the beginning and end of the exposure. The best solution is a dedicated cable release. This is a cord designed to trip the camera shutter without transferring any vibration or movement from your hand to the camera. Cable releases come in a variety of models depending on your camera and they work electronically, mechanically or sometimes are powered by an air bulb. More exotic models use sound, light sensors or beam interruption to trigger the camera. In a pinch you can use the self timer function built into most DSLR and point and shoot cameras to trip the shutter. The theory being that once you push the shutter button the camera has the self timer delay (the countdown), usually 10 seconds, to settle down and stop moving before the shutter actually opens to expose the photo. This of course only works at the longest shutter speeds available on your particular model of camera. If your camera has a maximum shutter speed of 30 seconds this is the longest exposure time you can use when incorporating the self timer as an actuator for the shutter.
Tripod Equipment Manufacturers sites:
www.manfrotto.com


