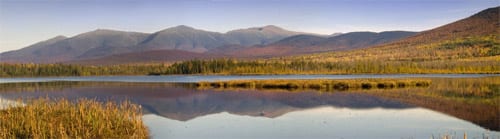
Panoramic Image with Panasonic DMC-L1 and DMC LX-2
Photoshop CS3 has a very robust “Photomerge” feature which allows you to take multiple exposures over a wide angle of view and “stitch” them together to make dynamic panoramic images. There are some steps to follow to get the most out of this
ability, however…
You need to be shooting in RAW format; if you have not yet started doing so, you should explore the capabilities of RAW and the processing that is involved after the image capture. We are going to assume you are familiar with RAW file processing, so let’s get started.

For optimum quality, the camera should be mounted on a tripod with a good head which will allow you to pan in smooth increments across the field of view you wish to capture. However, it IS possible to get great results at times in hand-held mode. Both of the images shown here were captured without a tripod. In either case, you need to overlap each image about 1/3 of the field of view. This allows the software to detect repeating patterns and line up the images precisely. In the one of the cityscape, I had the camera oriented vertically, and I overlapped in small increments. This resulted in a total of 12 exposures to get this field of view.
The camera should be on manual focus, and manual exposure. Use your histogram to fine tune your exposure, and shoot each exposure at the same setting. Also, it will be more convenient if you have your white balance set on one setting, say, daylight, rather than on auto, as that would result in slight variations as the sensor picks up different areas of light. Of course, all can be set to one setting in the RAW processor, but it’s easier to visualize if everything is consistent.

Highlight the exposures you have made that will make up the finished image, and open them in Adobe Camera Raw, whether in Lightroom or Bridge/Photoshop. I prefer to select all of the images, and make my adjustments (Highlight, shadow, noise, saturation, etc) on all at the same time. When you are finished, click “Done.”
In Photoshop, go to File>Automate>Photomerge and you will get a dialog box where you can select the files to use for the finished image. It’s probably best to select the “Auto” option at the left, at least until you get used to working with the action. Once you select everything and click “OK,” Photoshop does its work.
When it has made your composite, you will probably have to crop some edges out, and possibly clone along an edge or two as well. You may have a a seam or two that needs repair, especially in a continuous tone area like a sky, but I think you will be amazed at how well Photoshop does its magic as long as your basic exposures were on the money and consistent. Flatten the layers, and you can continue to do all your Photoshop tweaking as you would on any other image.
The photo of Red Rock Canyon near Las Vegas was done on my Panasonic DMC LX2,
an advanced “point-and-shoot” camera that I bought specifically because of its ability to shoot in the RAW format, enabling me to come away with images that look this good from a camera that can easily be carried when i don’t want to be encumbered by my whole professional kit.
Give Photomerge a try, and take your photography to a whole new plateau!

