Check out the Catch-light
 Digital Photo Academy and LivinginHD present a free monthly series of photography webinars on LivinginHD.com. Your host, John Bentham answers many questions live during the webinars. Additional questions and answers are posted here on digitalphotoacademy.com. You can also view the archived webinars for reference.
Check out the Catch-light
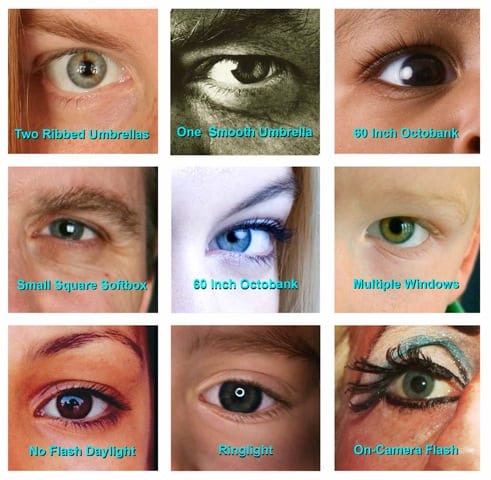
You’ve seen them, but do you know what they are, … or what they’re called? That white sparkle in the eye of a photo subject, it’s called a catch-light. The catch-light is the reflection of a light source in the subjects eye. These can be caused by a window, an on-camera flash, a studio flash, the sun or a bare light bulb or any other light source. Its a nice pleasing effect and gives the viewer a precise point to focus on when looking at a portrait, both literally and figuratively. The position of the light source, in relation to the subject and the camera, will determine if there is a catch-light, and also determine where the catch-light will appear in the eye. The specific type and shape of a catch-light is determined by the type, size and shape of the light source. A small light, such as an on-camera flash, results in a small catch-light, a large light source like a six foot Octobank, will make a larger catch-light. There are many different types and styles of lighting gear, umbrellas, round lights, rectangular and square softboxes, ring-lights, strip lights, large silks, in addition to an infinite array of windows and other sources of light. When you are first learning photography watching the catch-light is a useful learning tool when looking at photographs. If you like the lighting in a particular photograph you can often determine what type of light the photographer used to make that photograph. The photo grid shown here includes catch-lights made by some of the more common light sources. Use it to learn and recognize the different styles and you’ll be closer to learning what type of lighting you want to achieve yourself.
Adding a Catch-light: An good trick, when shooting outside in daylight is to add a catch light. Most often, when shooting in bright daylight there is enough light to allow you to shoot without flash. But if you turn your flash on during the day (Set Forced Flash On), in addition to adding a little Fill Flash (see DPA tips on Daylight Fill Flash) this will also result in a catch-light in the eyes of your subjects and give your photos that extra sparkle.
.jpeg)
Top Row
Two Ribbed Umbrellas : Two 36 inch Umbrellas, equidistant and approx 6 feet from subject.
One Smooth Umbrella : One 30 inch Umbrella, approx 4 feet from subject.
One Large Octobank: 60 inch Octobank, approx 10 feet from subject.
Middle Row
One Small Square Softbox: One 24 inch softbox, approx 5 feet from subject.
One Large Octobank: 60 inch Octobank, approx 10 feet from subject.
Bank of Windows: Four 3×8 foot windows, approx 20 feet from subject.
Bottom Row
No Flash: Lit by indirect daylight, Subject is standing under an awning, Notice the photographers reflection in the eye.
Ringlight: Produces a distinctive Ring catch-light and a very distinctive hard light.
On-Camera Flash: Speedlight, a very small light source of 1.5×3 inches thus producing a small catch-light.
Submitting your photographs for webinar consideration: Specifications and requirements.
Anyone can submit photographs for inclusion in the DPA, LiHD Webinar, Online Photo Class Series. If you would like to submit your photographs for an upcoming webinar, please read the following. Each webinar has a specific theme or topic. First go to LivinginHD.com, Tip of the Day, to determine the theme for the next webinar. Then review the submission requirements below and submit your photographs to info@digitalphotoacademy.com. Note that webinars are edited and formatted days in advance, thus please submit your photos at least a week in advance of the webinar, late submissions can not be added. Photographs are chosen, and edited, for their applicability to the webinar theme, artistic and technical merit, and content length. If your photograph is NOT chosen, it will be archived and may appear in a more appropriate future webinar.
Please submit your images in the following specs:
Compressed JPEG
Approx size 1MB per image
200 dpi
10 inch size longest edge
Please include your name and city in the image file name as below:
First_Last_City_01.jpeg
Please also include brief captions including subject, location and any pertinent tech info.
If it is not immediately clear from your image, for which webinar you are submitting photos, please indicate this as well.
By submitting your photographs for consideration, you grant and authorize, The Digital Photo Academy, LivinginHD.com and Panasonic, the following: The right to use your photograph(s) in the content and promotion of the webinar series, and for use on each company’s respective website. You further authorize your photograph(s) may be archived online and/or in a database, and allow unrestricted internet availability of the webinar(s) containing your photograph(s). You further authorize the use of your photograph(s) in any future webinars. By voluntarily submitting your photographs for consideration you agree to the aforementioned without any legal claims, or claims for remuneration, whatsoever. You, as the photographer, retain the copyright © of any submitted photograph(s) and proper photo credit and acknowledgement will appear with your photograph whenever possible and practical.

