Shoot Into the Light
 While leading my nature photo tours, participants often hear me say, “It’s all about the light.” Whether it’s the soft warm glow of sunrise / sunset, directional side light that enhances a landscape, soft overcast light that works so well for photographing people, or direct front light, the bottom line is the quality of the light is of great magnitude in determining the success of the image. Regardless of the direction from where the light originates, learning how to read it and knowing how it will impact a subject is essential to becoming a better photographer. Of the three primary lighting directions, backlight is the least often used as it presents challenges that are difficult to overcome. However, when used properly, backlit images have a tremendous amount of impact and seem to pop off the page.

©Russ Burden
Beginning photographers often hear that they should avoid photographing backlit subjects. The classic stereotyped message they’re told is to shoot with the sun behind their back so the subject is front lit. While this does hold validity in that it presents a situation to easily obtain proper exposures, the light is flat and lacks interest.
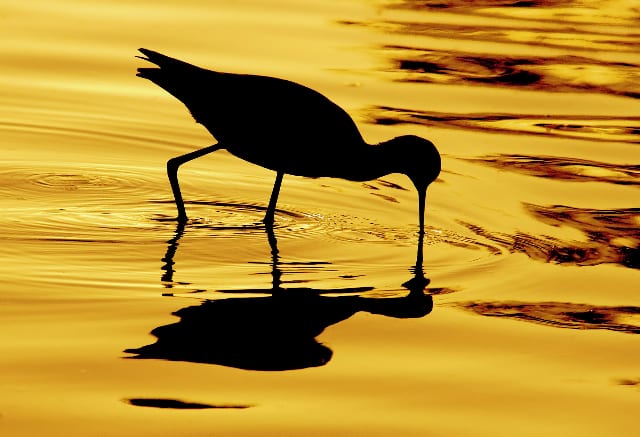
Backlighting is so much more intriguing and exciting. The purpose of photographing a backlit subject is to make it glow as the subject is rim lit in a halo of luminance. If the subject possesses translucent qualities, the effect is enhanced as it appears to be lit from within. Another purpose is to silhouette the subject to emphasize its shape and form. Make sure the background is strong, simple, and has a lot of color to prevent it from distracting the viewer from focusing on the outlined subject. Challenges – Exposure and Flare:Exposure: If capturing a silhouette is the primary focus of the image, take a meter reading from the area behind the subject. In the accompanying image of the bird in the water, I simply took a reading off the water in an area where there was no glare reflecting off its surface. I locked that exposure into the camera by pressing half way down on the shutter, recomposed the image and then made the picture. In a situation where the primary silhouetted subject takes up a large portion of the frame, the above technique becomes imperative or else the resulting image will be overexposed. The camera reads the large black silhouette thinking it needs to falsely open up the exposure and the result is a gray silhouette with an overexposed background. When in doubt, if the shooting situation makes it practical, bracket the exposure. If it remains consistent, compensate the exposure to the minus side.
©Russ Burden

©Russ Burden
Backlighting is so much more intriguing and exciting. The purpose of photographing a backlit subject is to make it glow as the subject is rim lit in a halo of luminance. If the subject possesses translucent qualities, the effect is enhanced as it appears to be lit from within. Another purpose is to silhouette the subject to emphasize its shape and form. Make sure the background is strong, simple, and has a lot of color to prevent it from distracting the viewer from focusing on the outlined subject. Challenges – Exposure and Flare:Exposure: If capturing a silhouette is the primary focus of the image, take a meter reading from the area behind the subject. In the accompanying image of the bird in the water, I simply took a reading off the water in an area where there was no glare reflecting off its surface. I locked that exposure into the camera by pressing half way down on the shutter, recomposed the image and then made the picture. In a situation where the primary silhouetted subject takes up a large portion of the frame, the above technique becomes imperative or else the resulting image will be overexposed. The camera reads the large black silhouette thinking it needs to falsely open up the exposure and the result is a gray silhouette with an overexposed background. When in doubt, if the shooting situation makes it practical, bracket the exposure. If it remains consistent, compensate the exposure to the minus side.
©Russ Burden
Flare: If the sun shines directly into the lens, the chance of getting a flare spot in the image is greatly increased. The use of a lens hood becomes essential to lessen the chance. But sometimes this isn’t enough. Stop the lens down and press the depth of field preview button as this will reveal if flare is impacting the picture. If so, carefully place a shadow across the front of the lens with your hand, a hat, newspaper, etc. The trick is to create a shadow across the front element without getting the item that creates the shadow in the image. If possible, find an element in the composition that minimizes the potential by placing the sun behind it as in the accompanying photo of the tree, rock monolith, and sun.
©Russ Burden
To learn more about this topic, join me on one of my Photographic Nature Tours. Visit www.russburdenphotography.com and click on the NATURE TOURS button for more information. Also, pick up a copy of my new book, Amphoto’s Complete Book of Photography. You can purchase a signed copy directly from me or visit your local book store or Amazon. Contact me at rburden@ecentral.com to order your signed copy.

