Image Enhancement With NIK Software Viveza 2
Digital Photo Academy and LivinginHD present a free monthly series of photography webinars on LivinginHD.com. Your host, John Bentham answers many questions live during the webinars. Additional questions, answers and tips are posted here on digitalphotoacademy.com where you can also view the archived webinars.
Dana from upstate NY asked the question: How do you edit large areas of a photo without affecting other specific areas?

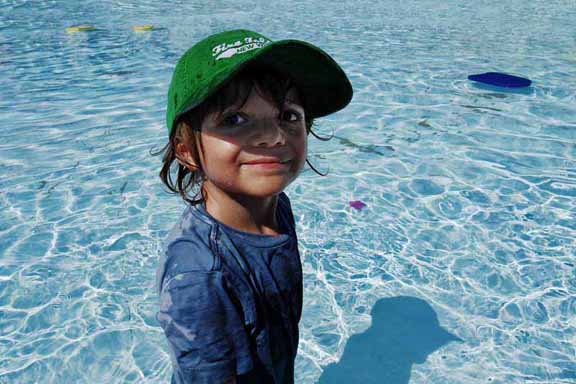
During the Image Enhancement Webinar John showed before and after photos of a boy in a pool. One the original shot, the second photo after retouching using NIK and Photoshop. Photoshop was used primarily to do clean up, often referred to as “Housekeeping” in post-production followed by image fixes using NIK Viveza 2. Photoshop was used to clone water and extend the pool to the top edge of the pool. A few of the pool toys and floats were removed, again with the clone tool to make the image a little less busy. A few were maintained to add dashes of color and to avoid a plastic, too-clean look which is the pitfall of a many re-touching jobs. If you use a heavy hand when re-touching which makes everything look clean, smooth and even, the image tends to look over-processed and fake.
There are a few ways to handle this problem. The best way to make adjustments overall but keep the characteristics of certain areas intact is with the Control Points of NIK Viveza. Take a look at the before and after photos of the boy in the pool. Look at the great detail and sharpness in the water after NIK was applied. This is a relatively easy and fast fix.
To achieve this you drop a number of control points in the water to effectively surround the boy, See image 3 below. Expand the area of effect to cover the water and avoid the boy as much as possible. Because the NIK Software system operates by selecting areas of color AND texture, in theory even if there is a little overlap because the color and texture of the boy are different than that of water the boy wont be affected. Then group all your control points. Use the select key and grab all the control points, which is similar to how you would select an area using using the select marquee tool in Photoshop. Once they are selected move the universal sliders on the right panel which, because you have grouped the control points will affect all the individual control point sliders. You may need to go back in and address slight unwanted changes such as slight color shift in the boy but this is a much faster method of affecting change in large areas without having to manually select areas.

The opposite method: See images 6-8 below. You drop a number of control points on the boy to grab the various areas of color and texture (the hat, skin, shirt etc). Do not group these (don’t select all). These effectively act as anchors, control points to maintain the look of those part of the photo. Then you drop one control point in the water. Expand the area of of that one point to cover the entire water area, in this case the entire photo.

This works well in theory but you may need to go back in to address a few changes in the boy. See image 8 where I’ve affected a radical color shift as an example. The boy’s face and hat maintain reasonably well but his shirt has changed, probably because its blue, like the water. Thus you might need to go back and re-adjust for the shirt.

To brighten up the shadow on the boys face caused by the hat John again used control points selecting the dark areas, then used the sliders to correct for Shadow Adjustment, brightness and contrast.

Undoubtedly there are other methods to handle any retouching or enhancement issue. Each photographer or photo retoucher approaches a problem from a different perspective depending on their training and sensibilities. You could consider a NIK class with DPA. Digital Photo Academy offers monthly NIK Software classes across the country to get you up and running fast.
Webinar Submission Specs:
All DPA students can submit photographs for inclusion in the Digital Photo Academy, LiHD Webinar, Online Photo Class Series. If you would like to submit your photographs for an upcoming webinar, read the following. Each webinar has a specific theme or topic. You can see the date and topic of the next webinar at LivinginHD.com, Tip of the Day, Online Photo Class. Note that webinars are edited and formatted days in advance, thus please submit your photos at least a week in advance of the webinar, late submissions can not be added. Photographs are chosen, and edited, for their applicability to the webinar theme, artistic and technical merit, and content length. If your photograph is NOT chosen, it will be archived and may appear in a more appropriate future webinar.
Submit your photographs to info@digitalphotoacademy.com
By submitting your photographs for consideration, you grant and authorize, The Digital Photo Academy, LivinginHD.com and Panasonic, the following rights: The right to use your photographs in the content and promotion of the webinar series, and for use on each company’s respective website. You further authorize your photographs may be archived online and/or in a database, and allow unrestricted internet availability of any webinars containing your photographs. You further authorize the use of your photographs in any future webinars. By voluntarily submitting your photographs for consideration you agree to the aforementioned without any legal claims, or claims for remuneration, whatsoever. You, as the photographer, retain the copyright © of any submitted photographs. The aforementioned companies will make best possible efforts to apply proper photo credit and acknowledgement with your photograph whenever possible and practical.

