Forced Flash On
Digital Photo Academy and LivinginHD present a free monthly series of photography webinars on LivinginHD.com. Your host, John Bentham answers many questions live during the webinars. Additional questions, answers and tips are posted here on digitalphotoacademy.com where you can also view the archived webinars.

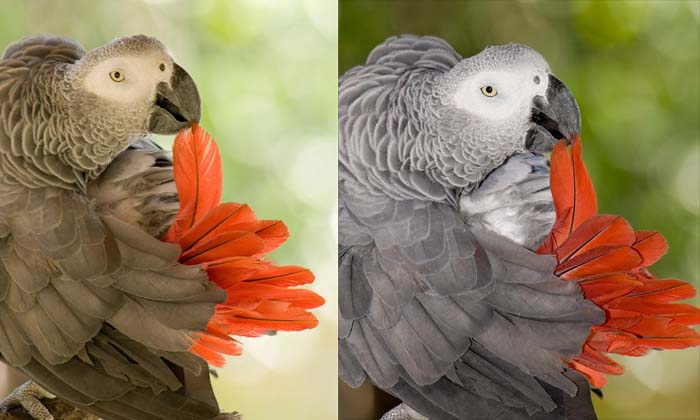
Photos by Russ Burden, DPA Instructor Denver
The parrot photos above illustrate a Flash Off version (Left), and a Forced Flash On version (Right). The daylight balanced flash source cleans up the too warm/green color balance on the plumage caused by sun filtering through the foliage. This results in a more correct color balance with neutral gray and white tones.
The following question regarding shooting in bright sunny light with dark shadows (difficult, tricky lighting in high contrast
situations), was submitted by The Wirgau Family from the LiHD website.
Wirgau Family Q: In taking pictures of my son for his Senior year, I did get some nice shots. I′m kinda a ′lucky′ photographer. I get good shots but don′t really know how I do it. Unfortunately, I did get a lot of shadowy shots or sunny, squinty shots. I just don′t know how to deal with the sun/shadows. Any advice?
John Bentham replied: Sunny, shadow photos, difficult or tricky lighting in contrast situations. If you are experiencing difficulty exposing photos in high contrast lighting conditions you might do well to watch the archived Tricky Lighting Webinar for tips on camera exposure: http://www.livinginhd.com/go/promo/opc_archive
There are a number of situations where sunny high contrast situations can trick a camera and render an incorrect exposure. I have linked a number of DPA Tips below that the LiHD family should refer to, alternatively a DPA class might be beneficial. It may help a lot if you set your camera to Forced Flash On. When shooting in any of the Auto Modes and outdoors in bright sunlight a camera meter determines there is more than enough light to shoot without Flash. The camera typically shuts down the flash and exposes the photo with ambient light only. By setting the flash to Forced Flash On you over ride this reading and add a boost of flash to dark areas, thus filling in the shadowy parts (under baseball caps or backlit subjects. This is an easy method of controlling differences in contrast between very dark and very bright areas within the same photo.

Photos by DPA student Julia Spring, student of Russ Burden, DPA Instructor Denver
The “squinty” shots can be addressed in a similar way. Turn your subject(s) around, with their backs to the sun and turn the feature Forced Flash On in your camera menu. The sun will illuminate the background of the shot and give you a nice separation (hair light) between the subjects and the background. The flash will illuminate the faces rendering a well exposed photo in both foreground and background without the squinting.
The addition of a burst of Fill Flash (Forced Flash On) in the beach wedding shot would have added more light on the front of the subjects in relation to the bright backlit sunlight. The photographer, Julia was able to clean up the photo and brighten the bride and groom against the background with NIK software. I always say, get it right in the camera whenever possible then use software to fix the little things. Julia used Viveza 2 and Color Efex Pro to brighten the image, bringing the contrast and color more in line between background and foreground, a nice solution and a fun photo.
The photo below from one of John Bentham’s NY fashion lighting workshops shows the students on location with cameras, on-camera flash units and a large Octobank Strobe powered by a Lumedyne battery location system. The model has her back towards the sun but the addition of flash from the Octobank brightens the exposure on the model in relation to the bright sun.

Photo by Marianne Ryan Swanson, DPA student of John Bentham, New York
The resulting photo below shows a good balanced exposure between the ambient light (available sunlight) and flash from the Octobank. The lens flare visible in the photo is a result of including the sun in the frame, resulting in lens refraction and glare. This is often a desirable effect, a sexy look for fashion or beauty photography. If you prefer to avoid this you need to reposition the camera slightly. Just make sure the light source (the sun) is out of frame and utilize a lens hood on your lens. The hood will cast a shadow on the front of the lens and eliminate the refraction and lens flare caused by direct sun hitting the front of the lens.

Photo by Karen Wu, DPA student of John Bentham, New York
Additional DPA Lighting and Flash Tips:
Fill flash, Outdoor lighting:
http://www.digitalphotoacademy.com/Home/UserArticleCategories/UserArticles/d
etails/params/object/8234/default.aspx
Daylight Fill Flash:
http://www.digitalphotoacademy.com/Home/UserArticleCategories/UserArticles/d
etails/params/object/13823/default.aspx
Bright Sun Fill Flash:
http://www.digitalphotoacademy.com/Home/UserArticleCategories/UserArticles/d
etails/params/object/1576/default.aspx
Lighting, Existing Light, Flash:
http://www.digitalphotoacademy.com/Home/UserArticleCategories/UserArticles/d
etails/params/object/13833/default.aspx
High Contrast and Saturation:
http://www.digitalphotoacademy.com/Home/UserArticleCategories/UserArticles/d
etails/params/object/13712/default.aspx
Lighting:
http://www.digitalphotoacademy.com/Home/UserArticleCategories/UserArticles/d
etails/params/object/9586/default.aspx
Webinar Submission Specs:
All DPA students can submit photographs for inclusion in the Digital Photo Academy, LiHD Webinar, Online Photo Class Series. If you would like to submit your photographs for an upcoming webinar, read the following. Each webinar has a specific theme or topic. You can see the date and topic of the next webinar at LivinginHD.com, Tip of the Day, Online Photo Class. Note that webinars are edited and formatted days in advance, thus please submit your photos at least a week in advance of the webinar, late submissions can not be added. Photographs are chosen, and edited, for their applicability to the webinar theme, artistic and technical merit, and content length. If your photograph is NOT chosen, it will be archived and may appear in a more appropriate future webinar.
Submit your photographs to info@digitalphotoacademy.com
By submitting your photographs for consideration, you grant and authorize, The Digital Photo Academy, LivinginHD.com and Panasonic, the following rights: The right to use your photographs in the content and promotion of the webinar series, and for use on each company’s respective website. You further authorize your photographs may be archived online and/or in a database, and allow unrestricted internet availability of any webinars containing your photographs. You further authorize the use of your photographs in any future webinars. By voluntarily submitting your photographs for consideration you agree to the aforementioned without any legal claims, or claims for remuneration, whatsoever. You, as the photographer, retain the copyright © of any submitted photographs. The aforementioned companies will make best possible efforts to apply proper photo credit and acknowledgement with your photograph whenever possible and practical.

