DPA Magazine
Family Portraits this Fall

1. Shoot late in the day because sunset light combines beautifully with the colors of Fall leaves. 2. Pick your subjects′ clothing so that everyone is wearing "autumnal colors". 3. Find open areas (like state parks in the mountains) so that wide expanses of fall leaves can be seen. Photographs © Joel Silverman, Atlanta DPA Instructor
Halloween
Get down to your subject’s eye level to give your photo more impact. Also, as in this case, a wide angle lens makes the pumpkins look even larger compared to the small girl. I was originally drawn to this subject because her jacket matched the pumpkins so well. Expose your pumpkin photo to take advantage of the warm candlelight, giving the image a more dramatic look. In this case, I exposed two stops under the suggested exposure. Photographs © Jon Canfield, Seattle DPA Instructor
Jack-o-Lanterns

A photo showing how families can memorialize their Jack O′Lanterns. Make sure your background is simple and darker lighting for the right mood. It also helps to have a black cat handy to cast a shadow!
Fall Foliage, 1 of 3

Fall Foliage Photo Pointers: Part 1 of 3 by Russ Burden Autumn is my favorite time of year. This holds true for both photography and life in general. The hazy days of summer give way to crisp fall mornings, the landscape is painted with a mosaic of warm toned leaves, the morning air has a fresh clean fragrance, and a rejuvenation of the environment takes place. For the photographer who loves color, it’s a magical time. From the grand landscape to a lonely fallen red leaf to a child romping in a pile of freshly raked leaves, there’s a plethora of subject matter. Whether your passion lies in photographing nature, people, photo journalism, sports, etc., adding a background of fall color will make your images pop. There are so many tips about taking fall photos which I can share that I’m dedicating the entire month of September’s weekly Tips to the subject. If you’re a regular reader of my Photo Tips and Techniques on Take Great Pictures, you may recall I’ve written a few series in the past. So for this week in addition to the next three, I will take you on a journey showing you how to improve your autumn photographs. Save or bookmark them and when the final installment is complete, you’ll have many tips to help you with your fall image making. Better yet, join me on one of my autumn nature photography tours so I can show you first hand my tips, tricks, and techniques - see last paragraph for info. The Powerful Polarizer: When heading out to photograph fall color, if I had room for but one filter in my camera bag, it would be the polarizer. It’s my workhorse. I use it to saturate an autumn blue sky, render cumulous clouds more prominently, and remove glare from leaves that robs them of their saturation. Depending on the angle of the sun, the leaves reflect its light. The polarizer helps remove this reflection and allows their colors to shine through. In order for a polarizer to have its greatest impact, the camera should be pointed at a subject 90 degrees from the position of the sun. At this position, the sky will be recorded its deepest possible blue. Be careful not to over-polarize making the sky unnaturally dark. Additionally, be careful when using wide angle lenses in that some sections of the sky may be darker than others. This is because the polarization trails off as you deviate from the 90 degrees and the field of view surpasses what can be rendered evenly. The Powerful Polarizer © 2007 Russ Burden Post Process in Photoshop: Digital photography makes it possible to capture a great shot that would otherwise not work if it was taken on film. The accompanying image of the black bear is a testament to this statement. Had I still been shooting slide film when I encountered the sow eating hawthorne berries in the middle of the day, I wouldn’t have stopped to take pictures knowing that the severe contrast of the light combined with a dark bear would net a poor photo. Knowing that Photoshop could help me rescue the digital file, I, along with approximately 75 other photographers 3 rows deep, kept firing away. To bring the file to a presentable state, I first applied a Shadow/Highlights adjustment. This feature is found under the Image > Adjustments menu. The default settings in the Shadows box are a bit aggressive so I suggest you slide the shadow Amount and Tonal Width arrows to the left. The dark area to the left of the bear’s head was drastically improved after applying this adjustment. In the highlights box, slide the Amount arrow to the right to darken them. I did this to help tone down the bright highlights on the leaves. The other key post processing step was to further reduce the glare on the leaves by painting over a wash of color. I sampled some of the reds and yellows using the eyedropper tool to match the tonality and then used the paintbrush tool at 20% opacity to help remove the shine. It took awhile to do this, but in the end, it made for a memorable image of the experience. Post Process in Photoshop © 2007 Russ Burden The Reflection: Fall foliage and reflections work well together in that you can essentially double the amount of color in each photo depending on how much of a reflection you include in the composition. Still water in the AM, glass buildings, and a shiny car are just a few ideas of surfaces that can be implemented. Still morning water is great to use as a nature theme, office buildings that reflect a classic red maple is great to include in a cityscape, and a car, it’s hubcap or even chrome bumper can work miracles to create an abstract of fall color mirroring the surface. If water is the chosen surface, use a graduated neutral density filter to even out the exposure between the reflection and the actual subject. The reflection can often be rendered too dark. The graduated filter will help neutralize the discrepancy of the exposure. The Reflection © 2007 Russ Burden To learn more about this topic, join me on one of my Photographic Nature Tours. Visit www.russburdenphotography.com and click on the NATURE TOURS button for more information. Also, pick up a copy of my book, Amphoto’s Complete Book of Photography. You can purchase a signed copy directly from me or visit your local book store or Amazon. Contact me at rburden@ecentral.com to order your signed copy.
Fall Colors

Look for contrasting colors as leaves change in the fall. Using a telephoto lens helps to compress the scene and makes the trees look closer together for a solid splash of color. © Jon Canfield, DPA Seattle Instructor
Tips for Creative Nature Photography
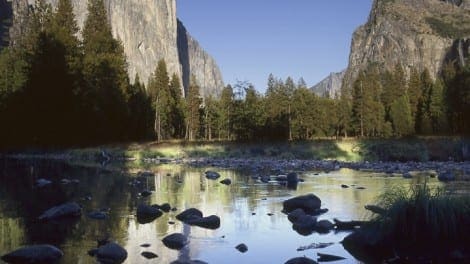
This image was captured in the late afternoon when the sun was shining brightly on the mountainside and the water was in shadow. Since the contrast between the two was so great, I made two exposures; one for the mountain and one for the water. I then layered the two images together in Photoshop, combining the best elements from each exposure. This image was captured just after sunrise in Kruger National Park, South Africa. As the light was still quite low, I took advantage of the longer shutter speed to pan my camera along with the elephant. This allowed me to keep the subject in focus, while creating the feel of movement. Photographs and text by Los Angeles DPA Instructor Rob Schroeder
Tripods, Window Mounts and Bean Bags

TRIPODS: In general, the heavier the tripod, the more stability it provides. Yet having one that′s too heavy is counterproductive in that it becomes a burden. A good rule of thumb is to purchase a tripod that′s sturdy enough to stabilize your longest lens. If the weight of the tripod is a major consideration, carbon fiber models are offered by all the major manufacturers. They′re light and provide excellent stability but at a higher cost. A great benefit of a tripod is it forces you to work more slowly allowing you to deeply scrutinize each composition. The benefit here is you′ll more easily notice distractions and undesirable compositional elements that can be dealt with prior to taking the picture. Another important reason for using a tripod is all your family shots can now contain every family member rather than leaving out the one taking the picture. Place your camera on the tripod, set the self timer, and the family album will be filled with the smiling faces of you, your spouse, and your kids all in the same shot. © 2007 Russ Burden WINDOW MOUNTS: Window mounts are used when photographing from your vehicle. Animals have become accustomed to cars which has lead to many great images in that the car is used as a blind. As it’s awkward to set up a tripod around seats, center consoles, and steering wheels, so evolved window mounts. With a window slightly rolled up, they fit over the lip and are steadied by a section that butts up to the inside panel of the door creating a solid platform for a tripod head and long lens. When using them there are a few things to keep in mind. Engine vibration is easily transferred so make sure it’s turned off or else the images won’t be sharp. Additionally, if there are other people or photographers in the car, you need to have an understanding that movement is restricted to times when a warning is given. When I know I will be in a specific spot for an extended length of time, I set up in the back seat as it provides more room. I don’t have to fight the steering wheel and pedals if I want to stretch my legs. Additionally, I can use the entire back seat to spread out all my equipment and be able to access it more quickly and efficiently. © 2007 Russ Burden Bean Bag: For all the benefits a tripod or window mount have, they are heavy and sometimes not practical. In many instances, you can often get away with just a bean bag. In comparison, they do have many restrictions, but there are times when they do shine. When rested on a car hood or window, a fence or railing, a rock, or even the ground, they add a lot of stability over hand holding the camera. There are many types and models. Each can be filled with an odd assortment of things. Some come pre-filled while most are designed to be carried empty and filled with sand, beans, rice, pebbles, or other small materials on location. Empty they weigh a few ounces. Think of the benefit if you’re backpacking. When you get to your destination, fill it with dirt and you’re good to go. They even have a great benefit when you’re back home and working in the wind. Attach a filled bean bag to your tripod for additional stability. © 2007 Russ Burden To learn more about this topic, join me on one of my Photographic Nature Tours. Visit www.russburdenphotography.com and click on the NATURE TOURS button for more information. Also, pick up a copy of my new book, Amphoto’s Complete Book of Photography. You can purchase a signed copy directly from me or visit your local book store or Amazon. Contact me at rburden@ecentral.com to order your signed copy.
Change Your Point of View
We are used to seeing the world from eye level with an undistorted natural perspective, so if you want to bring a fresh look to the scene, you have to change your viewing angle and/or lens perspective. Lie on the ground. Stand on a ladder (or climb a tree). Use a long lens. Use a short lens. It’s not work; it’s fun. The above scene, shot just after a foggy sunrise deep in the timber forests of Swaziland, had overwhelming natural beauty, but it wasn’t until I laid on the ground with a 15mm lens that I started to capture some of the awe that the true Creator had laid before me. (Note: the smoky blue wisp in the bottom right foreground is lens flare.) Image © Douglas Carver, New York DPA Instructor
Tips for Creating Active Summer Photos
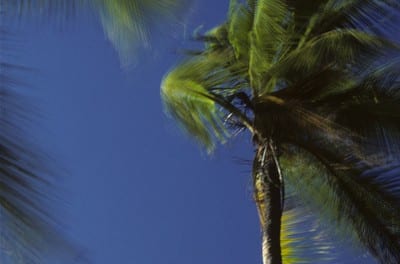
Our contemporary lifestyles are anything but still, especially now. Summer can be the most physically active season of the year for many of us, so why not activate those summer-time photographs with a little motion-blur to convey those experiences to a viewer with a greater amount of expression? Using the property of implied motion in your photographs requires a bit more technical risk-taking in camera handling, but these images can be very rewarding. Excellent sharpness and stillness is something that most people expect to see, and what every camera manufacturer promises to deliver in a photograph. That makes sense, because as an image-saturated culture, we are conditioned to think that a still-camera is the tool for creating still pictures, whereas a motion-picture camera is the tool used for creating motion pictures. However, this rationale is just like telling a person that plays clarinet that their music sounds like a clarinet. Where in fact, if the artist knows how to control the instrument a clarinet is capable of playing in a very wide variety of genre, and a listener hears the music, not the clarinet. Musical instruments and cameras are merely high-precision, high-expense tools in which we invest time to get better at expressing ourselves with. For just a moment now, think of a recent time in which using a digital camera felt rather uneventful because the images downloaded didn’t convey the essence of what it felt like to be in the activity. Here’s my point… the next time out with the digital camera, put it into the Manual mode, and consider producing a few frames with some motion blur along with the reliable auto or program mode methods. Allowing yourself to twist the ideas of stillness and motion together, in creating a photograph, puts you on the path to creating a visual crescendo about the event. By the way, I am still looking very closely for the auto or program mode setting on my son’s clarinet. If you know where that button is, please let me know. Requirements: • Digital SLR Camera • Put the camera into its fully-manual mode, and have a good understanding of how the light meter functions. Being able to change the aperture and shutter speed independently allows you to control the camera, and provides an opportunity to be more creative. • Choose the slowest-speed ISO setting available on the digital camera (usually 100). Consider Implementing One of These Techniques: • Create motion-blur with naturally moving objects… —Tripod required. The movement of the palm trees was captured in the middle of the day by choosing a low ISO (50) and smallest-aperture opening on that lens (f/32). Using a Polarizer filter not only increases the image color saturation, it reduces the amount of light entering the lens, by 1.5 to 2 stops. Those three actions in reducing light creates the need to choose a very long shutter speed to achieve a normal exposure. In this case, the wind was strong and the exposure time was about 6 seconds long.
Find the Less Obvious Source, and use a Tripod!
Don′t forget your tripod! Using a slow shutter speed (in this case, 3.2 seconds) you can allow the water to blur as it moves during the exposure. When you have a slowly-moving body of water, this gives you an almost glassy reflective surface, which allows for a wonderful reflection of the background, in this instance the rocky walls of an abandoned quarry. And, you can sometimes come up with a surprise, as the buildup of exposure time gives a view not seen by the naked eye. In this case, the river seems to be inhabited by a ghost who is watching me work! Can you see him? Images © Michael Hart, Houston DPA Instructor
