Day for Night Shooting

Day For Night: is a Motion Picture Film technique used primarily in the 1930s-1970s. The technique was developed when American film studios wanted to shoot scenes at night but the camera and film technology was not yet available to do so. The film speed (ISO, sensitivity to light) of film stock available during this period was too slow (100 ISO or less) to shoot in actual darkness. Don’t forget at the time motion picture cameras were limited to a frame rate of 24 frames per second. A frame rate in motion picture film is the equivalent of Shutter Speed in still photography. When shooting still photos you can adjust your shutter speed to shoot in low light, using a slow speed of 1/4 second or longer to expose a night scene. In motion picture technology if you adjust your frame rate to a slow rate of 1/4 second you record only 4 frames per second instead of the standard 24, or 30 frames per second (30 frames is common in modern video cameras). This, then affects the playback speed and viewable action. If the footage is played back at 4 frames per second you are effectively looking at 4 still images in a second and negate the film effect, the illusion of motion. If you run the footage at the standard projection or playback speed (24-30 fps) the scene appears speeded up with jerky action much like old Charlie Chaplin films. Thus the Day for Night Technique was developed.

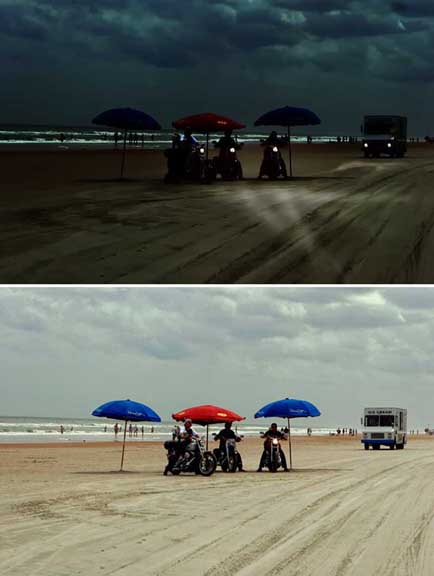
Photo by John Bentham
The bikers on the beach shot above, rendered in standard daylight and again in a Day-for-Night technique illustrate just how much one can alter the reality of a photograph. As Mary Ellen Mark repeatedly said to me in a workshop I attended in Mexico, Don’t just record, interpret!
The concept is relatively simple and can still be used today with digital cameras for either still photography or video. Used with, or without a tripod the technique is a essentially a deliberate use of an incorrect White Balance. First, you frame an outdoor daylight scene using a digital camera and determine a correct exposure. Then you adjust the camera White Balance setting from AWB (Auto White Balance) to Tungsten (Or Halogen depending on your camera). Alternatively you can set your camera White Balance to Daylight and mount a Blue Optical Camera Gel (Glass, Gelatin, Polyester or resin) to the front of the lens. The second step is to adjust the exposure, either in-camera, or more commonly in post production to darken the scene significantly to underexpose the photo or video by approximately 2-4 stops. The combination of blue color balance and underexposure give the images a faux night look, hence the term Day-for-Night.
The Day-for-Night technique became more widely known following the release of the Francois Truffaut film, La Nuit Américaine (1973), in which the plot centers around film makers making a film using the day for night technique.
With modern digital cameras having much higher sensitivity ratings (ISO), it is now possible to actually shoot at night, especially with still photography. When using a tripod and a relatively high ISO (800), a photographer can actually shoot the reverse technique, Night for Day. With luxuriously long shutter speeds of multiple minutes, instead of seconds you can transform a night scene into an eerie day lit scene, albeit one with stars in the sky.

Photo by Russ Burden, DPA Instructor Denver
Shot using a tripod and an exposure time of 4 hours, plus one minute of light painting the tree with a flashlight. This photo is remarkable, quite wonderful … The concentric circles caused by the trails of the stars as the earth rotates on it’s axis. This is a photo that reminds us we are not the biggest thing in the universe.
Tripods: When ever using a tripod and long shutter speeds you must avoid camera and tripod shake. This is most common when tripping the shutter to begin and end the exposure. The best solution is a dedicated cable release. This is a cord designed to trip the shutter of the camera without any vibration or movement transferred from your hand to the camera. Cable releases come in a variety of models depending on your model camera and work electronically, mechanically or powered by an air bulb. More exotic models use sound, light sensors or beam interruption to trigger a camera. In a pinch you can use the self timer function built into most DSLR and point and shoot cameras to trip the shutter. The theory being that once you push the shutter button the camera has the self timer delay (the countdown), usually 10 seconds, to settle down and stop moving before the shutter actually opens to expose the photo. This of course only works at the longest shutter speeds available on your particular model of camera. If your camera has a maximum shutter speed of 30 seconds that is the longest exposure time you can use when incorporating the self timer as an actuator for the shutter.

Photo by Russ Burden, DPA Instructor Denver
Another tripod photo, exposure time of 30 seconds with light painting on the log cabin to separate it from the dark rock behind. This image has a bleak yet beautiful emptiness, a haunting feel of another time and place. It’s so simple yet a weighty image.


